Welcome!

Welcome to the Designs by Ryn blog! The monthly Customer Creation Challenge can be found above in the navigation menu as well as links to my Shop, Facebook Page and Pinterest. Along the right you will find my Design Team. I hope you enjoy your visit and leave with some inspiration.

Monday, December 29, 2014

Flying into the New Year!

Hey Everyone,
We're about to move into 2015! I can't believe how full last year was for me! I always like taking a moment to look through my journal around this time of the year. It helps me to remember where I've been and to focus on where I might want to go. Sometimes I don't realize how much I've changed or the things that I've accomplished.
I also want to thank you all from the bottom of my heart for supporting me over the last year and for making this crazy life of mine possible ;) Big hugs to everyone!!!
Here's a couple of cards to celebrate. Flying into the night and emerging into a bright and hopeful day/year! I wish you a year full of positive experiences and whatever it is you need. Whether it's love, inspiration, friendship, healing... I hope that you find it :)
Using Candra and Lucine from my stamp collection
Using Raindrop Set and Luna from my stamp collection. If you look closely, Maidenhair Fern is in the bottom right too (stencil).
These two cards were made with Dylusions Ink Sprays and Golden Acrylic Paints. I also used Crackle Accents on the wings. I'll try to make a video tutorial showing how I do this soon.
Thanks for stopping by. I'll see you in the New Year ;)
Ryn

Monday, December 22, 2014

Water Droplet Tutorial (My first video!!!)

Hey everyone,

I've been wanting to make video tutorials for ages! Especially for the Water Droplets as I've had many of you ask me details about how to make them look the most 3D. To be honest, I've been a little bit nervous to be on film. That miiiiight have led me to putting it off for as long as possible :P There's always something else to do...

Since I invited Kellie Murton to the Design Team I've been thinking about making tutorials more and more. She's so natural on film showing all of her "mistakes" as a part of the creative journey instead of hiding them as if they are a bad thing. Creating is always a process of experimenting with colours, composition etc... So why hide it?! There's way more to be learned from seeing the whole process.

So, with this in mind... I've given myself a little kick and recorded my first video. I found the right apps and made the whole thing on my iPad. It's only 4 minutes but it's amazing how long editing takes! A big thanks to Kellie who advised me that I might have to do a few voice overs at first. Lol. I definitely did... My head (and some crazy hair) sneaks its way into some of the shots. I'll have to adjust the angle next time I film. Ah well. Letting go of trying to be perfect right?!

Okay so here it is... A step by step tutorial showing how to get this effect with my Water Droplets stamp (unmounted on Water Effects 1). You can follow the same steps with any of my Water Effects designs.

I hope you find it useful. I've added all of my links to the video description. Please leave me a comment and feel free to pass the link along to whoever you think might find it helpful. Would love to hear your thoughts on my first tentative step into film ;)

If I don't post again before Christmas I'm wishing you a wonderful holiday!!!

Bye for now :)

Ryn


Thursday, December 18, 2014

A Card for Kirk...

Hey everyone,

Hope Christmas preparations are going well for those of you who celebrate :)

Over the past two weekends I've found some time to play with my art supplies. Managed to get a couple of cards done for my family. Non-traditional and non-seasonal as always. I can't seem to design within the seasons ;) Here's one of my cards... My boyfriend Kirk liked this one so I'm saving it for him ;)

The background was made by layering Golden acrylic paints. I stamped Tsuki overtop with VersaFine ink when it was dry and painted overtop of the image. To add depth to the wings I applied some Crackle Accents in some areas of the wings. You can see it well below.
To finish it off I stamped Sea Bubbles Set around the border and coloured some of the spots with Stickles and paint. Got that idea from the DT. I also sponged some Golden Interfernce Violet through Floral Spirals (stencil). Love how that paint catches the light!!!

Well, that's it for now! I hope you liked my card :)

Bye for now,

Ryn


Monday, December 01, 2014

December News!

Hey everyone :)

I can't believe Christmas is almost here!!! I've got December's sales to announce today and also the winner of November's Customer Creation Challenge.

Also, if you're thinking of doing some Christmas shopping in my online shop please keep in mind delivery time for international orders. Canada Post is going to be busy with Christmas mail so delivery times will probably take a bit longer than the 7-14 business day estimate. Best to order sooner rather than later.

Here's a pic from the coffee shop I'm working at today (Revel in Stratford, ON). Isn't their tree lovely?! I had to share a photo :)

Sales for December

Okay, on to this month's sales... Hope you like em'!

Celtic Star 3 - $4.49

Celtic Star 2 - $4.49

Silhouette Dove Set - $5.99


Heart of Light - $4.49

November's winner is...

A big congratulations to Carola!!! Thanks so much for your contribution to last month's challenge :)

Here's a link to Carola's blogpost for these two pieces. Love the compositions in these. In the first card is Hanging Droplet Set (part of unmounted sheet - Water Effects 1) and in the second card is Raindrops (part of unmounted sheet - Water Effects 2).

Well, that's it for me... Thanks for stopping by my blog. I hope all goes well for you wherever you are :)

Until next time,

Ryn


December Customer Creation Challenge


Monday, November 24, 2014

Clean, Simple and Stunning Pieces from Maria

Hello everyone,

Maria Daeyaert's 4th Guest Spot

This will be Maria's last Guest Spot for now. I'll definitely be inviting her back again. She's made absolutely beautiful art with my stamps and it's been a pleasure getting to know her a bit better through our correspondence :)

This batch is something completely different than what we've seen so far from Maria Dayaert. Clean, simple and still stunning. I love how she's used colour sparingly to accentuate the designs. The outline around the Seahorses and Starfish works really well to blend them into the background. They feel like they belong there instead of being stuck on like a sticker.

In this card Maria used Seahorse Set, Sea Bubbles Set and Rising Bubbles.
In this card Maria used Starfish Set and Sea Bubbles Set.

In this card Maria used Selini, Dancing Faerie Set and Leafy Branch.

Maria's process for these pieces...

"I used pencil crayons with a lot of pigment (Derwent pencils) and the paper is the backside of Timholz card stock. It looks like craft paper but I liked the colour more. It's a bit darker than regular craft paper. I also used black archival ink, white embossing powder and versamark. From Stampendous I used Enamel red (for the fairy dust) and Enamel white and gold for the other cards!! I also used my white gelly pen for the white accents!!"

About Maria...

In 2013, I was the lucky winner of the Dutch poster contest from the Art Specially Event. I'm also a member of the CB Design Team!!

I was really surprised that Ryn asked me to be a guest designer. I'm also very honoured that she let me play with her unique stamps! They are real fun to play with! You can go your own way with them and try out different things ( like I did with the starfish stamps. I created some christmas stars with them, just for the season!) I really loved using them and hope you like what I made. Thank you Ryn for the possibility to be an guest designer with your stamps!!"

Maria's blog: http://marjasknutsel.blogspot.be


That's it for now. I hope you've been enjoying the art that I've been sharing on here. Please feel free to comment with your thoughts. I know Maria will check out what you've written. I'm sure she'd also love a visit on her blog if you have the time.

Bye for now!

Ryn


Thursday, November 13, 2014

Unmounted Stamps

Hey everyone,

Thought I would write up a little post about my unmounted sheets of stamps. It's been a busy and exciting few months getting this option ready for my online shop and for wholesale.

How this came about...

Big changes and big decisions. When I first started out I had no idea that I would take the business in this direction. It was also just a dream to think that one day the volume of mounting and cutting would be too much for me to do alone.

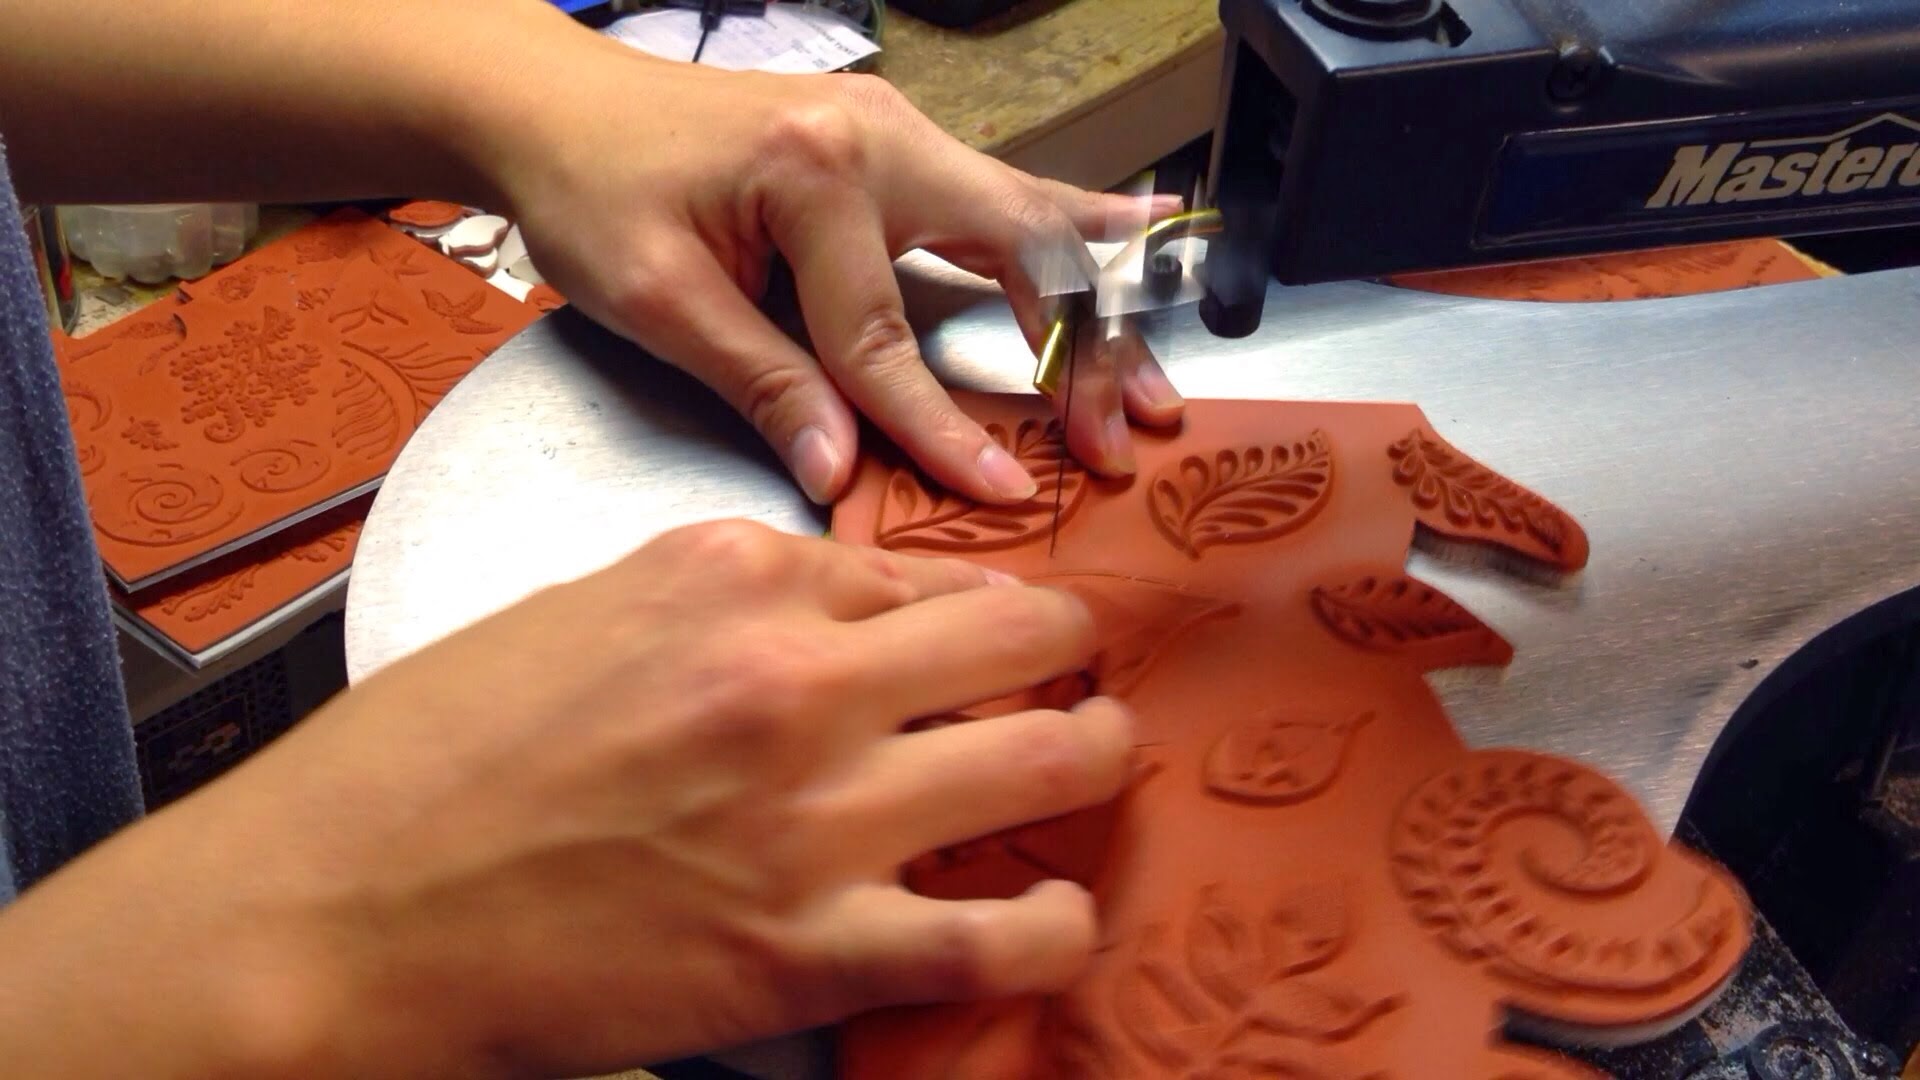
Four years later, I'm still mounting and cutting the cling-mounted stamps at home on my scroll saw. As time has gone on, I've noticed myself spending more time cutting the stamps and less time designing. Store owners, having seen your beautiful art out there on the internet, have approached me wanting to carry my designs in their shops as well. A really exciting opportunity! This led to what I call a "good problem" - I just couldn't balance cutting and designing anymore.

Am I a manufacturer or a designer? In the beginning I had to be a jack of all trades but as time went on and the business kept growing I had to decide, what do I really want to be spending my time doing?

My first solution was to look for someone to do the scroll sawing for me. I put out a few ads and did interviews. I even tried out a few candidates without finding a good fit. Actually, it was a bit of a nightmare! I ended up losing hundreds of dollars in product with someone who disappeared without a trace. Other people claimed to be proficient with a scroll saw but ended up producing cuts that I didn't feel comfortable selling... Through the experience I ended up realizing that I had actually developed a specialized skill. One that wasn't so easy to find out there.

If I wanted to sell my stamps at wholesale discounts and to continue growing my collection of designs, it became clear that I had to find another solution... Unmounted stamps are what I came up with.

My unmounted sheets

I am very happy to finally be able to offer my designs at wholesale discounts. The unmounted sheets are now available in shops around the world. I'm continually updating my retailer list on my site HERE.

I've also made the sheets available in my Online Shop. Although I still offer the cling-mounted version of the designs in my online store, I encourage customers to try out the sheets. If you like several of the designs on each sheet you can get them at a much lower price per piece. Around 40-50% off.

For shipping charges keep in mind that each sheet has several stamps on it. This increases the weight of the product. When I did the math, I found that the shipping charges for unmounted sheets are around the same price as if you were to buy all of the stamps on the sheet separately as cling-mounted stamps.

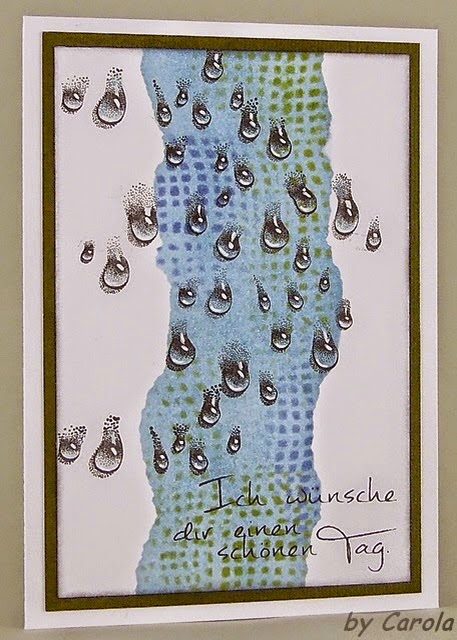
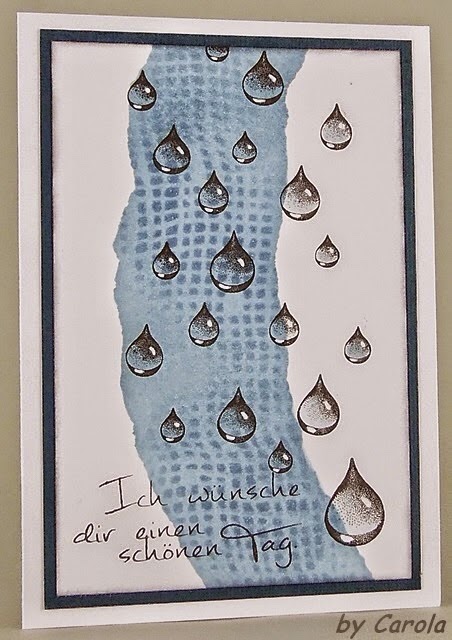
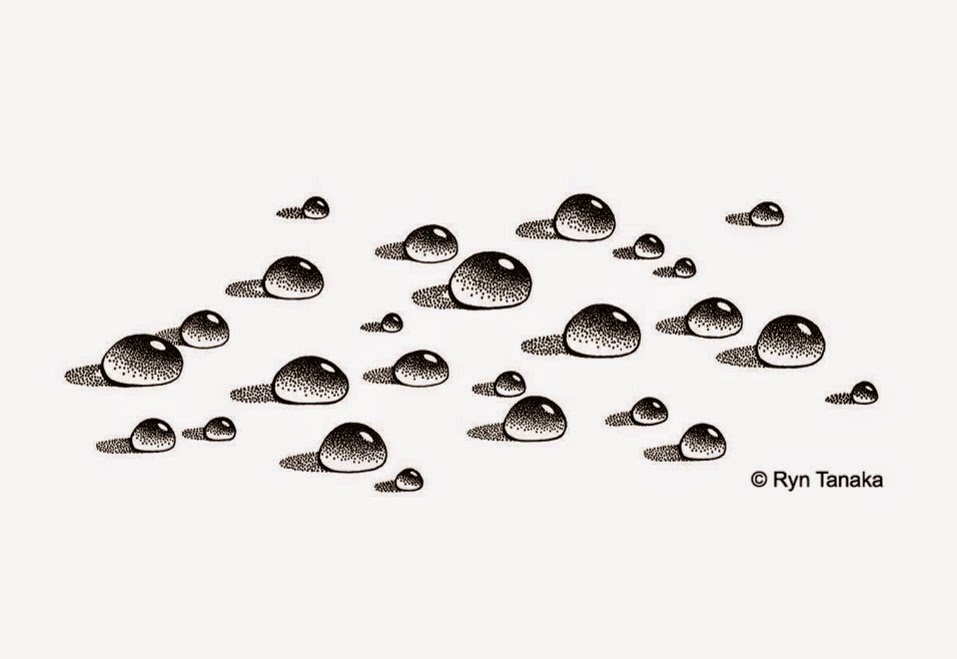
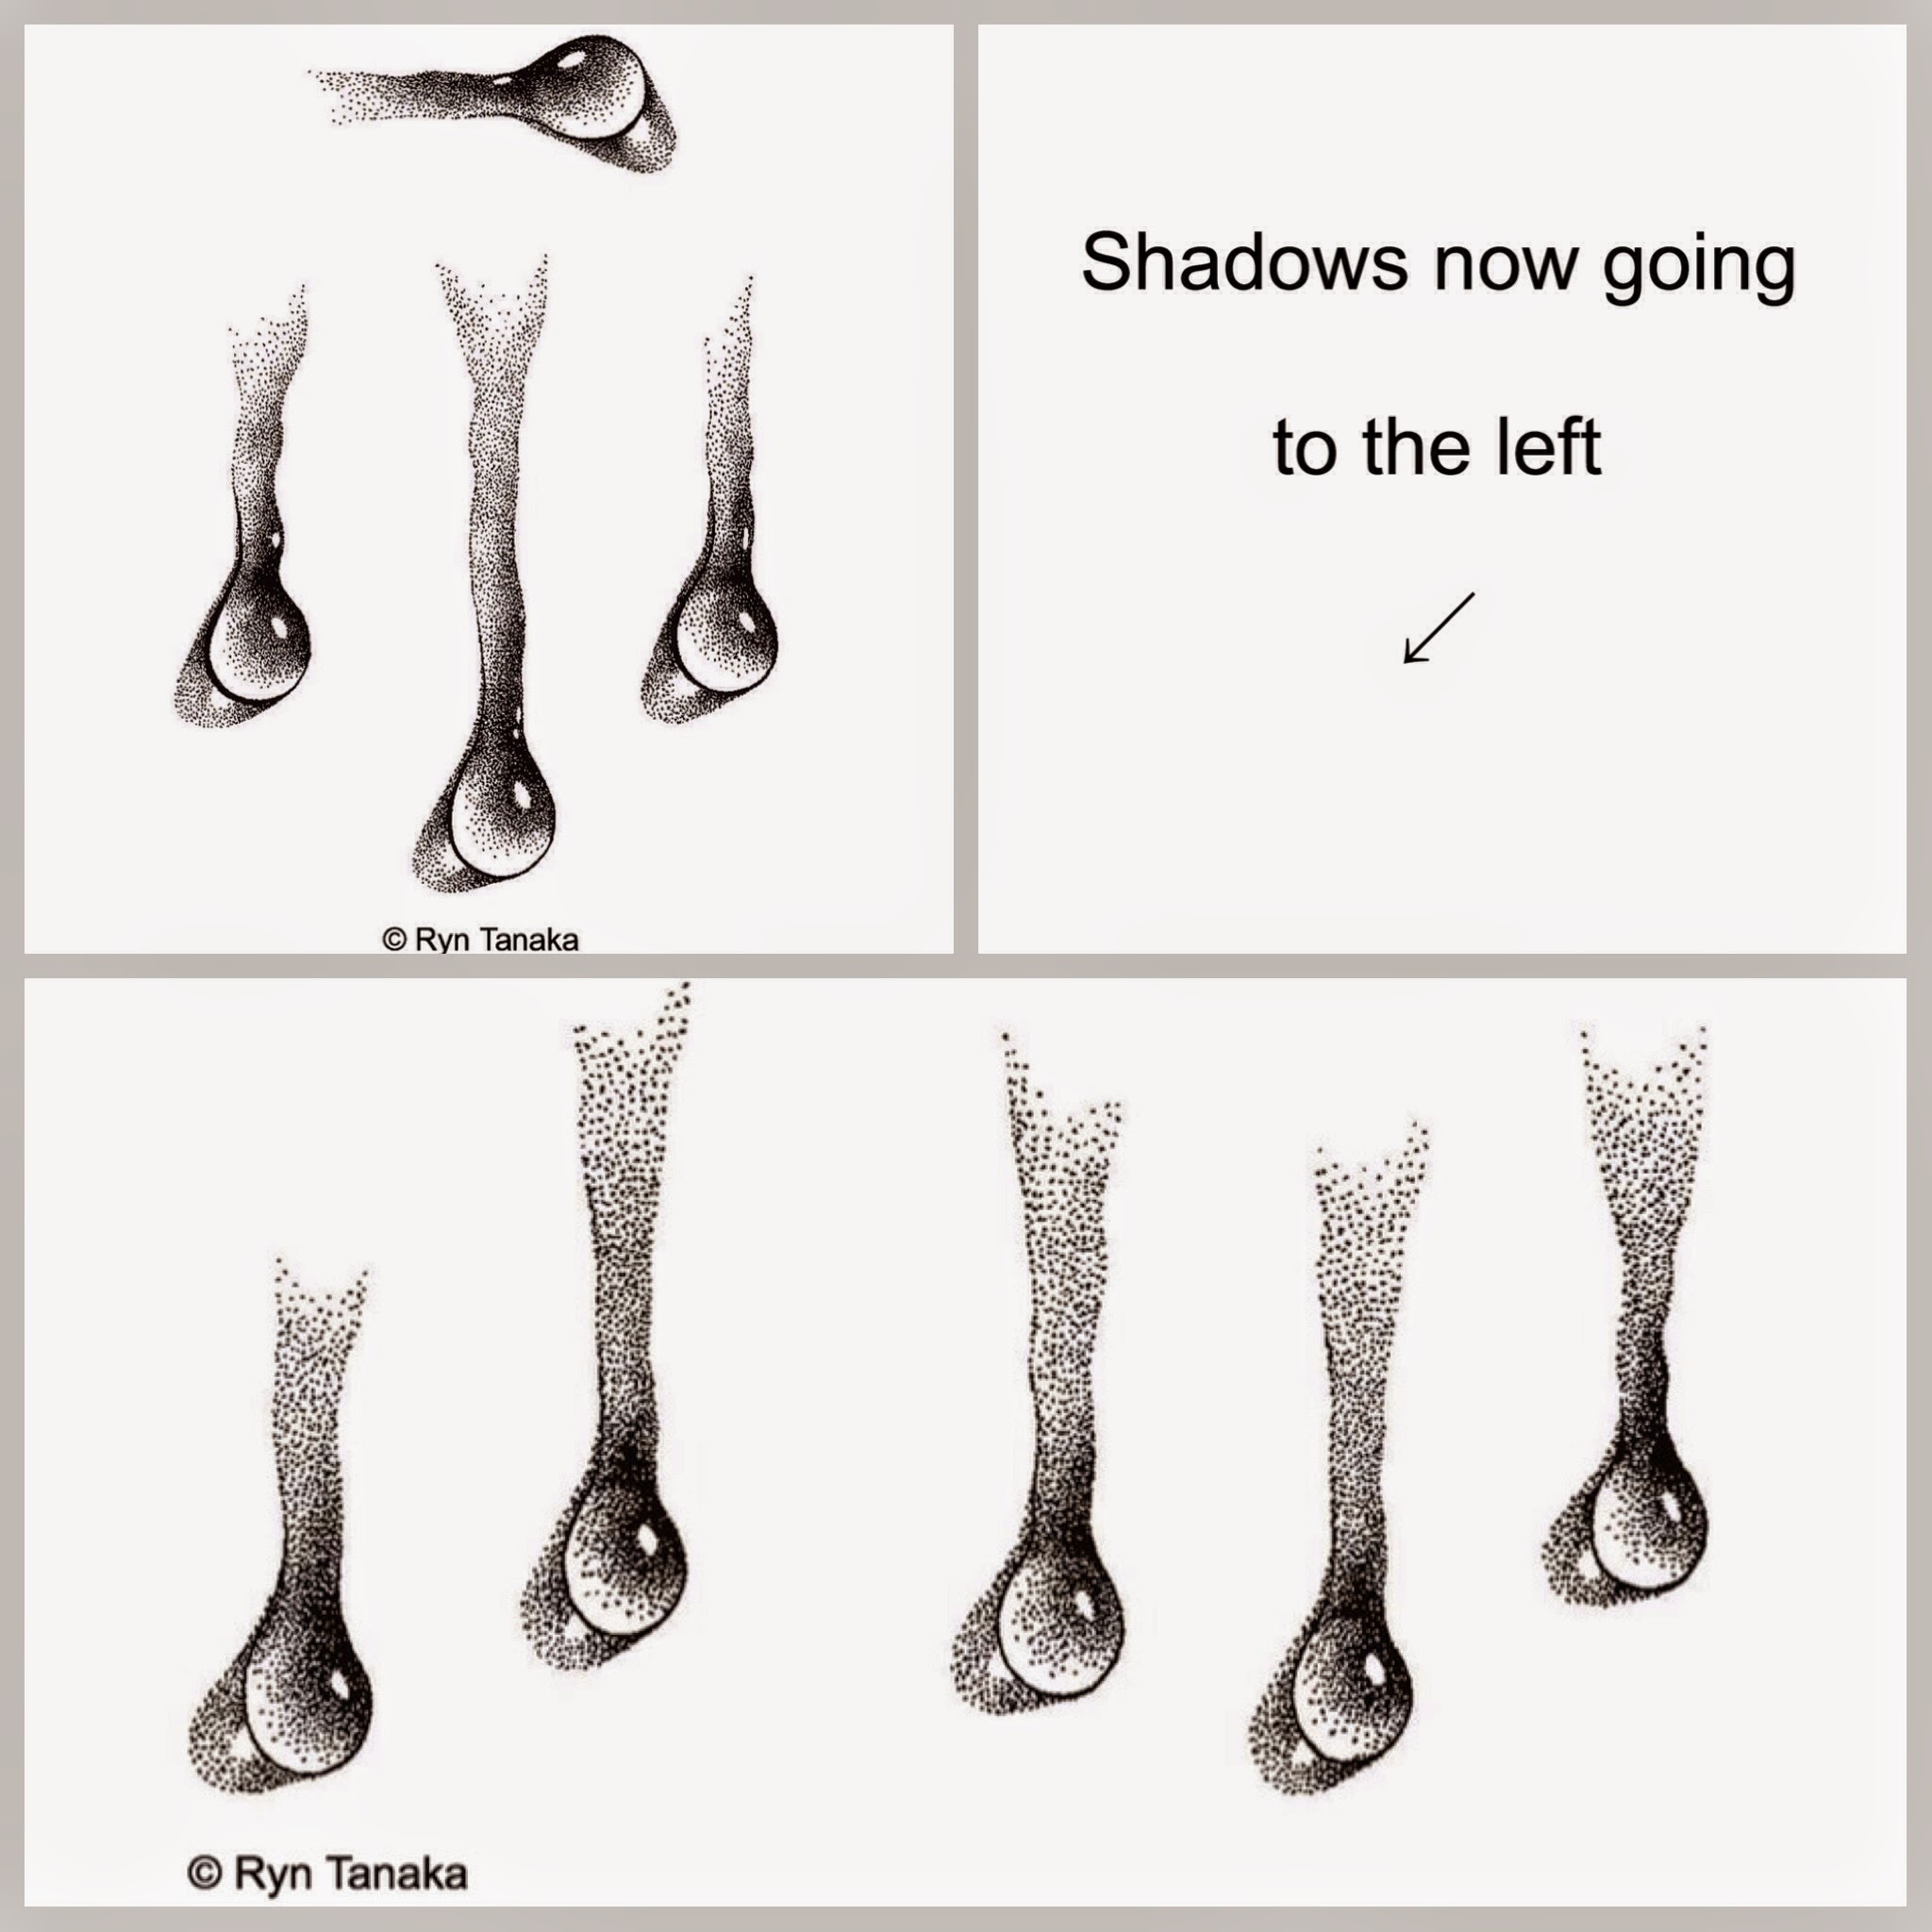
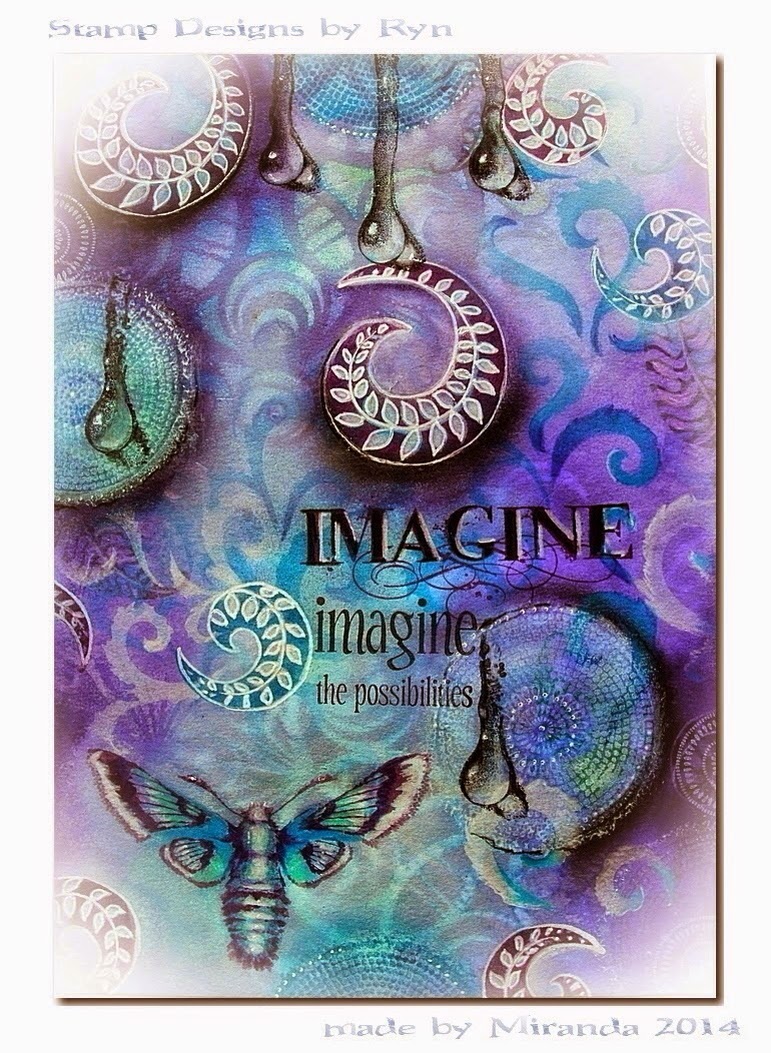
Unmounted sheet - Water Effects 1 includes Water Droplets, Sideways Droplets, Rising Bubbles and Hanging Droplet Set

Mounting your own stamps

For printing the designs with ink or paint, I recommend mounting the stamps onto cling-cushion and separating the designs with sharp scissors. The cling-cushion sticks to acrylic surfaces with a static charge. A flat hard surface such as an Acrylic Stamping Block will ensure that the stamp is pressed evenly in order to capture all of detail in the design. I am currently looking into a good source for cling-mount sheets for those of you who don't have a place to buy it nearby. I'll let you know what I come up with.

Here's a link to DT member Kellie Murton's first try mounting and cutting the sheets. She also mentions some alternatives to cling-mount. Lots of good tips in there!

https://m.youtube.com/watch?v=_kVnLm79gzA&feature=youtu.be

Leaving the stamps unmounted

For pressing the designs into materials such as clay or polymer clay, I suggest leaving the sheets without a backing. The plain rubber will allow for more flexibility and control when pushing the designs into a soft surface. Unmounted stamps are also easily cleaned with warm water. Gently work the clay from between the ridges of the design before it gets the chance to harden.

Thanks for stopping by

I really appreciate you reading about what I'm up to :) If you've got any questions please get in touch by leaving a comment. You can also reach me on Facebook or write me an email. I check my inbox every day (except weekends). designsbyryn@gmail.com


Bye for now,

Ryn


Tuesday, November 04, 2014

More Art from Maria

Hey everyone,

Hope all goes well for you! Today I've got Maria Daeyaert's third set of makes using my stamps. To those of you that have missed my previous Guest Posts for her, Maria lives in Belgium and makes mixed media cards and tags. She's a member of Chocolate Baroque's talented Design Team and has been kind enough to create some beautiful pieces using my stamps and stencils. I'll include a little bio at the end of the post.

Maria's Makes...

These blew me away!!! Perfect rich colours for Fall and a warm playful feel to these pieces. They could be illustrations to a children's book... "And then the little faerie danced among the swirling leaves to celebrate the changing of the seasons"... Something like that ;) Maria, you have my imagination going!

I originally designed this little faerie to be dancing. I never thought of her as sitting until I saw these pieces from Maria. I almost like her sitting now better than dancing. This works so well!
Love her holding onto one of Three Leaves Set. The scale works so well. She looks tiny and light. It seems completely feasible to have her riding on the back of a moth.
Neat layout idea isn't it?!

In these pieces she used the following stamps from my collection:

Here's a link to Maria's blog. Full of her beautiful creations: http://marjasknutsel.blogspot.be

A Bit About Maria...

"Hello everyone. I'm Maria and I'm here with my first designs with the fantastic Ryn stamps. I live in Belgium, a very small country but with Brussels as Capital of the European Community!! I'm just retired (the 1st of oktober) from a job in the "public services". I'm 61 and a half years young. I have three grown up sons and a very sweet husband!! I love crafting! At first I made some projects with cute stamps but that changed when I went to the Art Specially Event in the Netherlands for the first time in 2010. I saw all the beautiful art works - especilly the work of Miranda Degenaars - and I was really inspired. I wanted to learn how to do that too!! So I went to some workshops to learn the basics. I'm not an expert but I manage to do my own thing. I always think that it's the result that counts not the way you do it, so I experiment and have fun trying out my own technics. I like bright colours and am drawn to Dylusions inks, Distress ink and paint. Anything as long as it is bright and cheerfull!!

In 2013, I was the lucky winner of the Dutch poster contest from the Art Specially Event. I'm also a member of the CB Design Team!!

I was really surprised that Ryn asked me to be a guest designer. I'm also very honoured that she let me play with her unique stamps! They are real fun to play with! You can go your own way with them and try out different things ( like I did with the starfish stamps. I created some christmas stars with them, just for the season!) I really loved using them and hope you like what I made. Thank you Ryn for the possibility to be an guest designer with your stamps!!"

Bye for Now

That's it for now. Thanks so much for stopping by :) I would love for you to leave me and Maria a comment. I know that she checks these posts and would love to hear from you. I'm sure she'd also welcome any questions that you might have about her process. Please also visit her blog. Lots of good art up there. You won't be disappointed.

All my best to you,

Ryn

Saturday, November 01, 2014

November News!!!

Hello everyone :)

Lots of news today! New stamps, the Customer Creation winner for October and November Sales!!! Here goes...

New Designs

Here are my newest cling mounted releases - available next week in my online shop as a part of a themed unmounted sheet. You may have noticed them offered already by my retailers on the sheets titled Water Effects 1 and Water Effects 2.

Hanging Droplet Set

This first one was inspired by studying droplets on the shower wall. Lol. I'm studying bubbles and drops everywhere that I go now! You've challenged me to come up with better and better designs so I'm working hard on my draftsman skills. Hanging Droplet Set comes with two pieces as seen below...

Sideways Droplets

This stamp is the updated version of my old design Water Droplets 2. I can be a bit of a perfectionist when it comes to the stamp designs and I was never happy with how the latter stamped. I kept thinking that I could do better. Since Water Droplets 2 was released I've improved my technique to capture all of the little dots that make up the 3D effect. I feel that this stamp shows way more detail and leaves a much crisper imprint.

I need to also mention that I have improved on the original Trickling Water and Trickling Water Set designs. I saw many of you combining the old designs with my other water effects. Unfortunately I hadn't thought of that possibility when I designed them and I drew the shadows going in the opposite direction. Hindsight :/ I've fixed this in the updated designs so that the shadows of ALL of my droplet effects now go in the same direction. MUCH better for mixing and matching.


Customer Creation Challenge Winner for October...

As always, thank you to everyone who uploaded their art to last month's challenge. I SO love seeing what you create :) A winner for a free stamp was randomly picked by Inlinkz this morning. A big congratulations to Denise Silva!!!!! Here's her scrapbook cover and a link to her BLOG

Sales for November

I decided to pick four this month... No particular reason. Just because :)

Admittedly, I'm not a very good seasonal designer. I'm always drawing random things at whatever time of the year. I'm not sure that I'll ever get a handle on timing. Lol. Anyways, I thought I'd try to coordinate sales to the right time of the year at least ;) Here's thinking about Christmas and winter... Some Doves, Stars and Love for you...

You made it through my post ;) Thanks for stopping by and for caring about what I'm up to!
Until next time,
Ryn


November Customer Creation Challenge


Wednesday, October 15, 2014

Stencil Give Away Winner and Maria's Second Guest Spot

Hello everyone,

Give Away Winners

Firstly, a BIG thanks to everyone who stopped by my blog last week for the Paper Crafter's Library spotlight on my company. I really appreciate your support and thoughtful comments :) A big congrats to the winners!!! I'll be sending a free set of stencils to these two women:
The Paper Crafter's Library winner - Debbie Cudley
Give Away on my blog - Brenda Perkins

Maria's Second Guest Spot

Next, I've got some beautiful art to share with you from Maria Daeyaert from Belgium. I featured her work a couple of weeks ago in this space and am back with some more for you! This time with a little info on how she made each piece. If you would like to pay her a visit here's a link to her blog: http://marjasknutsel.blogspot.be
In this piece Maria used Flowing Branches (stencil) and Celtic Start Set (stamps) as ornaments. Doesn't the white glow around them have a magical feel to it? Love how this turned out!
Maria's Process for this Piece:
"The background was made with some Glittermists from Tatterend angels (coffee shop, walnut gold, sunflower, bronze , delphinium) and some salt. For the tree I used the tree mask and memento dye ink -Rich cocoa, the stars are stamped with versa mark and embossed with bronze embossingpowder , to make some structure I used embossing enamel - aged scarlet from stampendous. To give it some accents I took my white gelly pen "sharpie" and the text stamp is from CB!!!"
Three Leaves Set (stamps) falling from Flowing Branches (stencil)
Maria's Process for this Piece:
"I made the second card with dyllusions ink. First I spread some water all over my card then I used yellow , orange, green and red on it and let the colours blend together a little bit. I put some salt here and there and let it air dry. I then took the tree mask and with a baby wipe I took the colours out of the tree in the background!!!(2 times) When everything was dry I took the mask again and placed it in the middle of the card. To colour it I used some dark brown distress ink starting in the middle. To make the other smaller trees I used some of the smaller branches from the stencil. Lastly, I stamped the beautifull leaves with versamark and used some golden embossing powder. After melting the powder with my heat tool I used a very fine black pen and went around the leaves to give some black accents."
In the background of these tags Maria's used Fiddlehead Set (stamps) and Three Leaves Set (stamps). Notice, she's also used Flowing Branches (stencil) as the flower stem. Nice touch!
Maria's Process for these Tags:
"These two tags are made with Dylusions ink. I used black and bronse embossing powder for the leaves and golden embossing powder with Fiddlehead Set. The tree mask is used as stalk for the flower"
Last but not least, Here's an underwater scene using Spiral Shell, Clownfish, Kelp and Rising Bubbles (stamps).
Maria's Process for this Piece:
The card is made with bister powder and water. I stamped Kelp with some distress inks for the background. Wanda and Spiral Shell were stamped with memento black and coloured with watercolour pencils, copics and watercolour paints."
Thank you so much to Maria for Guest Designing with my stamps and stencils! I've really enjoyed seeing your art so far :) All inventive and vibrant works! I'll be showcasing more of her work soon.
Thanks to everyone else for stopping by to see what I'm up to. Wishing you a wonderful rest of the week. I would love for you to leave me a comment and I am sure Maria would love a visit as well if you have the time: http://marjasknutsel.blogspot.be
Bye for now,
Ryn

Wednesday, October 08, 2014

Stencil Give Away and Paper Crafter's Library Spotlight

Hey everyone,

Paper Crafter's Library Spotlight

Exciting news today! The Paper Crafter's Library has asked me to come back for another company spotlight. They've helped me a lot through the years to get myself out there and to be seen by more people. A big thank you to them - especially Andrea and Karen - for this opportunity :)

Give Aways - yes, two of them!

To switch things up a bit this time I decided to show my new stencil collection. We're celebrating by giving away a set of the stencil designs (3 in total) on both the Paper Crafter's Library blog AND on mine. So, you have two chances to win.

Here's a link to the Paper Crafter's Library spotlight on my company and the give away. Just leave a comment on their blog to qualify for their give away: http://blog.papercrafterslibrary.com/featured-company-designs-by-ryn-3/

Simply leave a comment at the end of this post. I'd love to hear about which examples you love and why or how you would like to use these stencils on your own art. Please either leave me a way to get in touch with you or be sure to check back here next Wednesday the 15th. I'll be announcing the winner then.

The Stencils - 1,2 and 3

Examples from the DT...

I sent a whole different set of examples to the Paper Crafter's Library for their post. LOTS of eye candy! Thanks so much DT! I've listed all of their blogs under the photos if you want to pop over for a visit.

Eileen Godwin - Flowing Branches

Shirley Deatcher - Maidenhair Fern

Wendy McCarthy - Floral Spirals

Anja Hardenfels - Maidenhair Fern

Miranda Degenaars - Floral Spirals

Karin van den Broek - Maidenhair Fern

Alie Hoogenboezem-de Vries - Flowing Branches

Bye bye!

Thanks for popping by :) If you've found me through the Paper Crafter's Library please let me know in your comment and keep in touch. I am Designs by Ryn on Pinterest/Facebook and my website is: www.designsbyryn.com if you want to check out my stamps. Many of the images in these samples are from my collection of rubber stamps.

Hope you enjoyed my post! Wishing you lots of luck with the give aways!

Ryn