Welcome!

Welcome to the Designs by Ryn blog! The monthly Customer Creation Challenge can be found above in the navigation menu as well as links to my Shop, Facebook Page and Pinterest. Along the right you will find my Design Team. I hope you enjoy your visit and leave with some inspiration.

Thursday, May 28, 2015

Crackle with Hibiscus

Hey everyone,
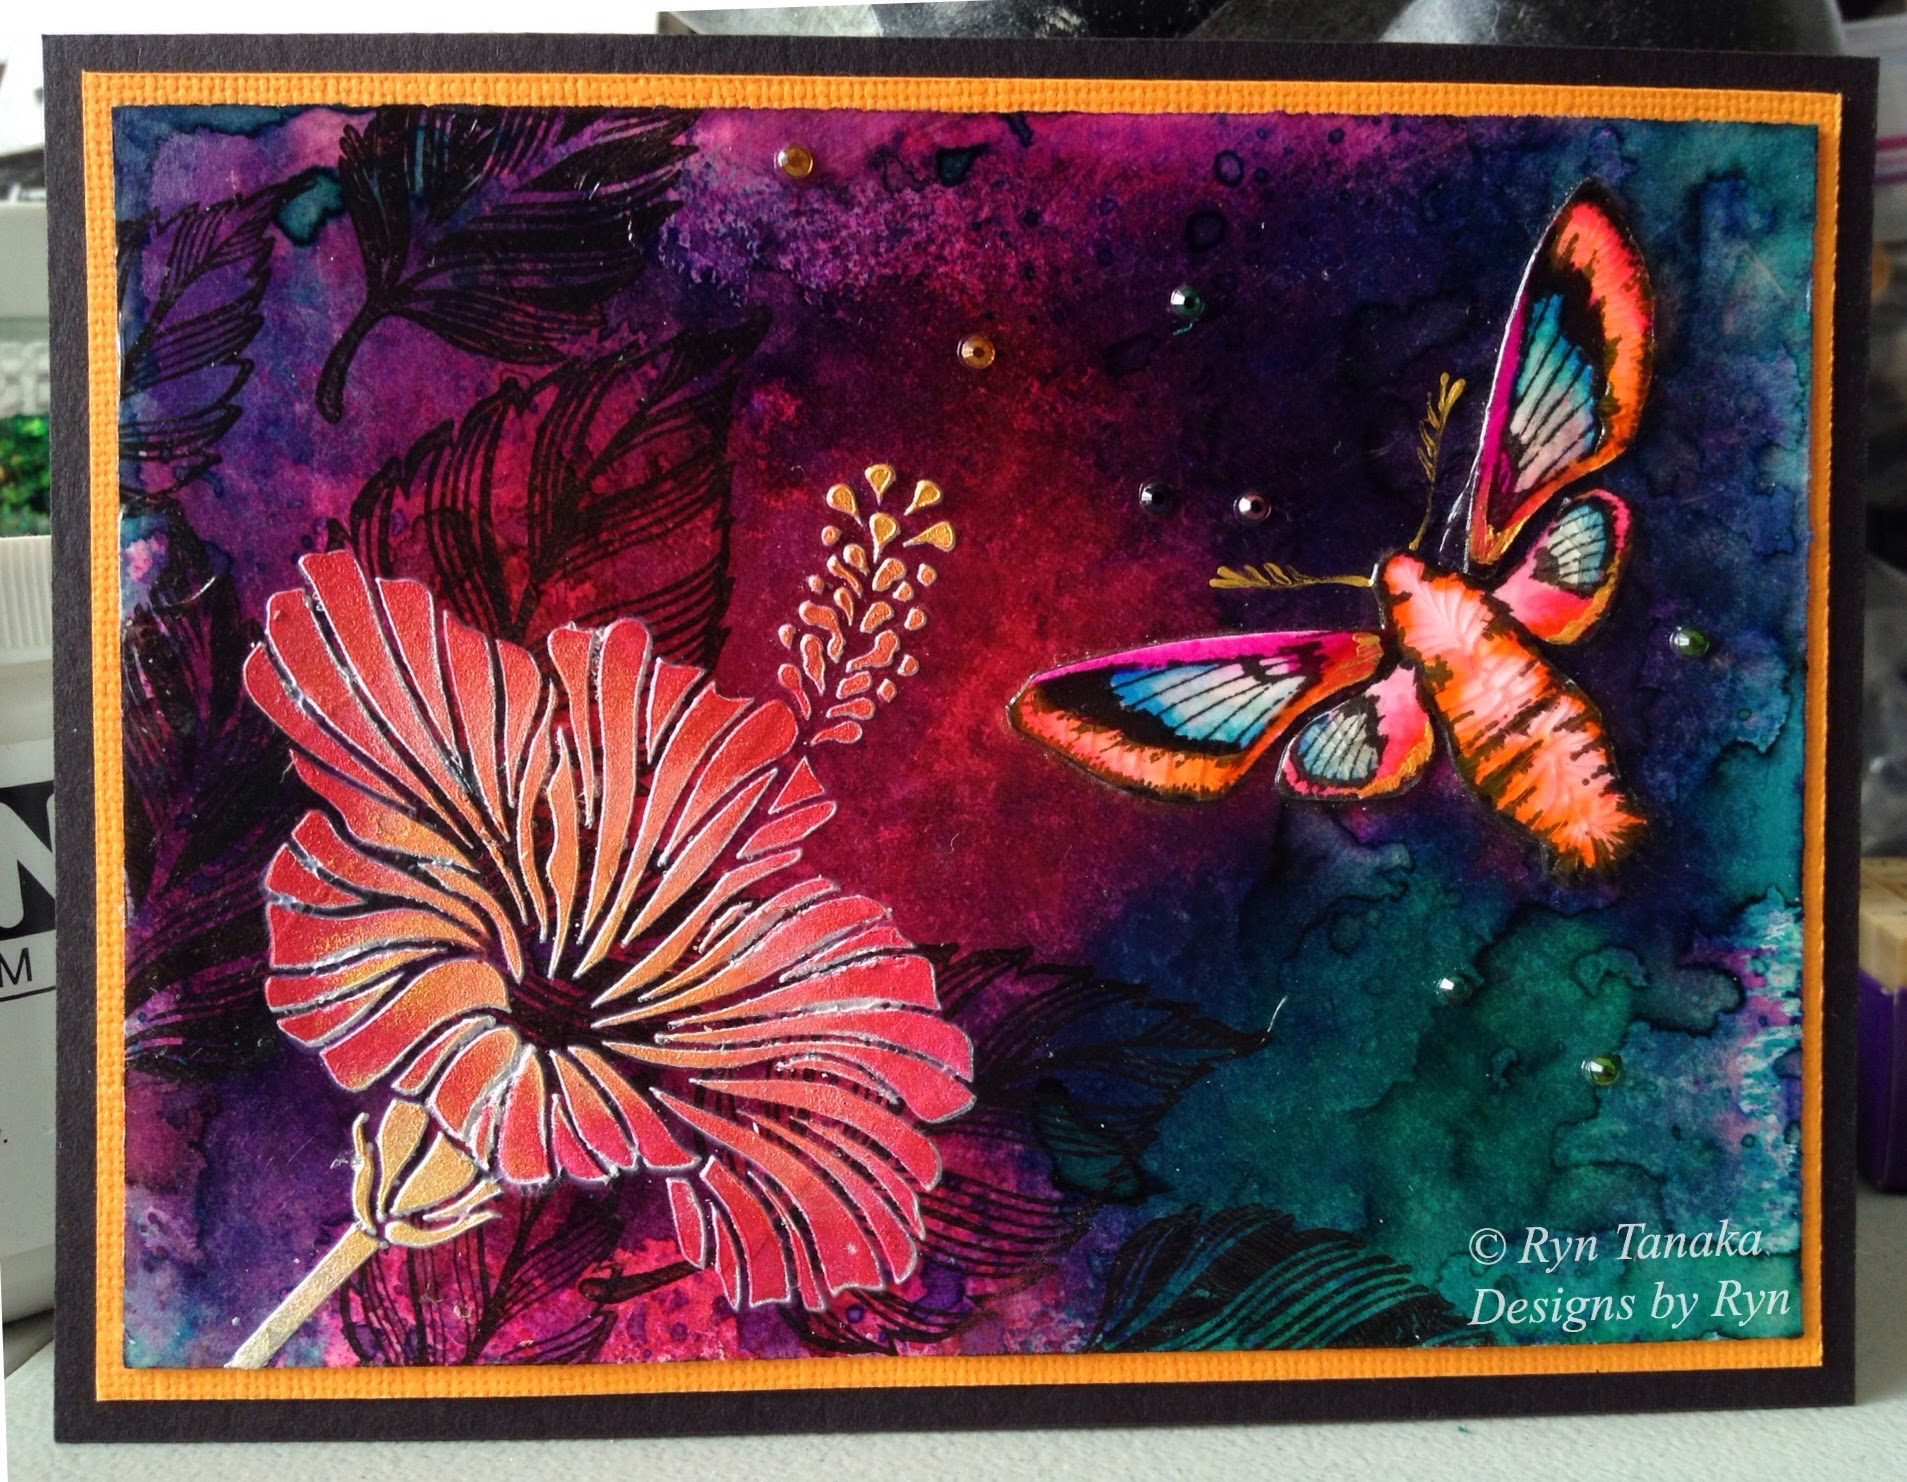
Here's a card that I made using my Hibiscus stamp designs and Crackle paste. First play with crackle paste and really liked the effect. Crackle paste NOT crackle glaze (Crackle glaze dries clear).
The green and blue hibiscus flowers were added last. Embossed in gold over a scrap of watercolour background then cut out and stuck down.
A close up of the crackle effect. Will have to play a bit more with dry brushing paint onto it when dry. I like the look of how it catches on the ridges. Recommend using it on solid surfaces though (I think I'm going to try a wood canvas next). This card was so thick and warped by the end that I had a challenging time sticking it to the mat.
The Hibiscus designs in the background were clear embossed on a watercolour background. I then added black ink over top. It filled in all the spaces around the stamped images leaving the original colour background showing through the stamped designs. All of the acrylic paints and crackle glaze came after that.
I've had a couple of requests to make videos of how I do this. Its a tricky thing to capture because there are so many stages and the process always changes. I'm always experimenting. I've tried to document the creation process a few times and the videos really didn't work. I'll keep trying. I think you're right, it's so much easier to explain visually than with the written word. I'm a visual learner too. I watch cooking shows on YouTube instead of reading recipes ;)
Ok, that's it for now! Thanks for leaving me your comments on my last posts! Love reading them :)
Bye for now,
Ryn

Wednesday, May 27, 2015

I Love Colour!

Hey everyone,
Two posts in two days! This is unheard of for me! Lol. Thanks so much for your comments on my last post :)
Thought I'd show you another card that I made recently... A quick summary of how I did it at the bottom...
Sideways Hibiscus stamped with black versa fine ink and coloured with acrylic paint. Hibiscus leaf Set (at the bottom) was embossed onto a scrap piece of watercolour paper, cut out and stuck onto the card with Golden - Regular Gel (Gloss).
A quick card recipe:
  • Dylusions ink spray background on mixed media paper.
  • When dry stamped Spiral Branch Set over top and coloured the leaves with Tombow markers
  • Sealed with Golden - Regular Gel (Gloss). Applied with a brush. Leave brush strokes.
  • Golden acrylic paint dry brushed over the ridges of the dried gel. Leave little windows into the background.
  • Pick an area that is as smooth as possible to stamp Sideways Hibiscus. Used versa fine ink. Dried with a heat gun.
  • Using a detail brush, paint the flower with acrylic paint.
  • Stamp Hibiscus Leaf Set onto a scrap piece of watercolour paper and emboss.
  • Cut out leaves and add the leaves to the border. Stick down with more Golden - Regular Gel (gloss).
These cards never turn out the same way. Just let loose and have fun!
Thanks for stopping by!
Be back again soon - probably not tomorrow though ;)
Ryn

Tuesday, May 26, 2015

Hibiscus and Moon Wings

Hey everyone,

Hope you're doing well :) Thanks so much for all of your wonderful comments on my posts. So appreciated! A really quick post today. Not much time to write details. Here's a brief summary...

I used my typical technique of a Dylusions ink spray background on mixed media paper. Stamped the Hibiscus leaves from my collection in black Versa Fine ink. Sealed it with Golden - Regular Gel (gloss). Pops out the colours even more! I then used modeling paste through my Hibiscus stencil - let dry - then put the stencil back overtop and sponged on acrylic paint to colour it. The moth (Lucine from unmounted sheet: Moon Wings) was stamped onto a separate piece of mixed media paper. I coloured it with Tombow markers, cut it out and stuck it on with more Golden - Regular Gel (gloss). When dry I add crackle accents on top. Love how it makes the moth look furry. Last touch was to add some rhinestones to the sky! I lie... The last touch was to mat it. The card didn't look finished until I saw it with that orange border. It tied all of the colours together...

Hope you like it! Thanks so much for stopping by!

Off I go for now!

Ryn


Monday, May 11, 2015

A Peek at my Art Journal

Hey everyone,
Here are some pics of pages from my art journal. Some of them don't really have focal points and I'm ok with that. I'm using my journal to learn techniques and am more focused on having a fun messy time than creating polished finished pieces.
Most of these were made by starting with a Dylusions ink spray background. I then added acrylic paints, glitter, bits and pieces etc... Hope you enjoy!
This one reminds me of space. A nebula... Or something like that :)
Playing with crackle glaze. A great way of adding texture to a piece! I used Sideways Hibiscus from my Hibiscus - unmounted sheet and Hibiscus stencil in the background.
Using Water Droplets from unmounted sheet - Water Effects 1.
In this one I used my Gingko stencil with modeling paste. I then covered it in tar gel mixed with fluid acrylics. Like how it turned out. Reminds me of leaves floating down the river.
Maidenhair Fern stencil with modeling paste in the foreground. Rubber ink through it in the background.
Floral Spirals stencil with modeling paste and then painted over with many layers. This one started out gold. It was WAY too much so I painted green overtop. When the light catches the gold layer beneath it makes the green shine. Didn't show that well in this shot. Still not completely happy but whatever... I might find inspiration down the road and cover it all up with another layer. Lol. The beauty of layering and mixed media!
Something completely new for me but I realllly enjoyed making this one!
There is so much going on in this one I can't begin to remember everything that I stuck down to make this page. Fun!
I do so love gold... It's so hard for me not to cover everything in it...
Well that's it for me for now. If you're curious about any of techniques that I used let me know. Might give me ideas for future videos.
Bye for now! Wishing you lots of inspiration with whatever project you're into :)
Ryn

Tuesday, May 05, 2015

A Guest Spot for Caro

Hey everyone,
I'm back with a Guest Spotlight for Caro from Austria! Caro has been supporting my creations for years. Almost since the beginning of my company! I asked her to do a guest spot recently and to my delight she said yes. It's been great to watch her style change and evolve as time goes on. I'll get to a little gallery with her art but first a little bio about her...

A Bit About Caro...

"My name is Caro, I'm 37 years old and I live with my three children in Vienna (Austria). In the crafting world and in forums I'm also known as "cbee".
In the past I didn't believe that I could do anything creative. But as I discovered rubber stamping in 2009 it was a revelation for me - I could create beautiful things without having to draw! First I created cute cards but soon I found out that I liked non cute even more. Now I create almost only non cute projects.
A few months after discovering rubber stamping I began to scrap too. Now I am incorporating stamps into my layouts more and more. And I love to play with colors, different shapes and mediums.
I love to create cards, layouts, minibooks, altered art, art journaling pages and of course ATCs.
Most of my work can be seen on my blog. Some of my projects have been published, here you can find my publications.
If there are any questions you are most welcome to write me: cbee [at] gmx.at"

Caro's Creations

Really like how Caro made a flower corsage for the horse using my Hibiscus designs. I'm calling it a corsage, perhaps there's a technical term for this type of decoration for racing horses? Neat combo of photos, stamping and paint in this collage.
Here's a close up of the "corsage"
A page from Caro's art journal
A combination of my Hibiscus stamps (foreground) and stencils (background). Nice use of both together! Like the soft background in contrast to the sharper foreground images and colouring
A couple of simpler card designs from Caro. Like the stamping over text and soft colouring
Well that's it for now. Hope you liked this little presentation of Caro's creations! Thanks for stopping by.
Bye for now,
Ryn

Friday, May 01, 2015

May News

Hey everyone,
Some quick news for May...

April Challenge Winner

Thank you to everyone who shared their art in last month's challenge! I really appreciate seeing your creations. I've randomly drawn a winner for April. A big congratulations to... Lagene!
Please contact me to receive your free cling-mounted stamp or stencil: designsbyryn@gmail.com
Below is the piece that she entered using Raindrops from my unmounted sheet Water Effects 2. HERE is her blog post.


Sales for April

I've chosen these stamps to be discounted by 50%. I picked flying creatures as a theme. Definitely inspired by Spring... I'm including a little gallery of some pieces that the DT has done with these stamps. Hope you enjoy!
See Miranda's blog post HERE
See Shirley's blog post HERE
See Karin's blog post HERE
See Wendy's blog post HERE
See Anja's blog post HERE
I'm keeping it short and sweet today. Wishing you a wonderful day :)
Ryn

May Customer Creation Challenge